So I have been working for a while on this project. My goal is to create a cheap lasertag solution, and they way I want to achieve it is to use ESP8266 modules communicating over wifi. Right now I'm in the middle of the development, but I have to order an other ESP8266 board, so I'm writing this article basically for me to be a reminder of what I did sofar. Although it might be useful for others too.
Here is my very first prototype:
As you can see I'm using an ESP8266-12 based development board with onboard voltage regulator and programmer, so I can program it via USB. I got it from ebay for $6.
I'm using the arduino ide to program it (for more see:
https://github.com/esp8266/Arduino). For some reason the printed pin numbers on the board are not the same as I can access them from the code. So here is the mapping between the two:
Board - code
D1 - 5
D2 - 4
D3 - 0
D4 - 2
D5 - 14
D6 - 12
D7 - 13
D8 - 15
The board also has 2 built in led, a blue and a red available on pin 2 and 16 from the code.
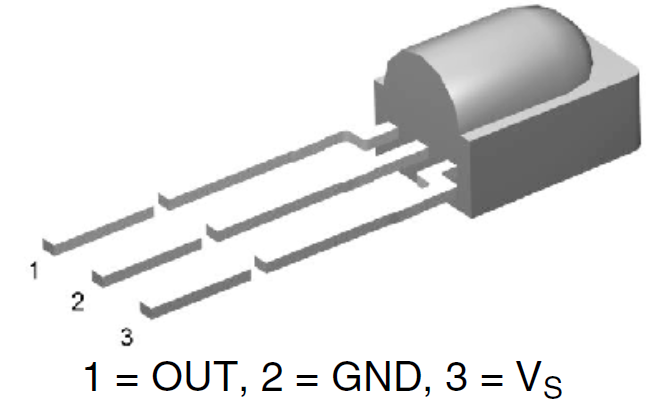
I have a red laser diode connected to pin D5/14, an IR receiver on D2/4 and a trigger with pull down resistor on pin D6/12. The IR receiver is connected this way:
The code uses the IRremoteESP8266 library, which was partly ported to ESP8266 by me and available here:
https://github.com/markszabo/IRremoteESP8266 With this library it's easy to shoot and detect if got shot. However I want to add feedback also for the killer (like some sound from a piezo buzzer or similar). This feature is the main reason why I'm using ESP8266 and not simply arduino. So when the victim got hit, his gun will send a message to the killer, to notify him. To do this I chose a very easy solution: each gun is serving a webserver on port 80. The code, what the guns are sending through IR is the last 3 digits of their IP address. So when the victim receives a hit, it decodes the IR code, then sends a simple HTTP GET request to that IP like GET /?killed=123, where 123 is the last number of the victims IP address. It seems to work, but right now I have only one working ESP8266, so I could not test this feature
And here is the code (right now it's a bit "spaghetti code", in the end I will write it better):
#include <IRremoteESP8266.h>
#include <ESP8266WiFi.h>
#include <ESP8266WebServer.h>
//**************
//CONFIGURATION
//**************
//Pin config
int triggerPin = 12; //D6
int laserPin = 14; //D5
int receiverPin = 4; //D2
//Wifi config
const char* ssid = "MMaarrkk";
const char* password = "Iwilltellyoutomorrowat824";
//Misc config
int minimumTimeBetweenShoots = 500; //in millisecond
//Global variables
ESP8266WebServer server(80);
String lastNumberOfIP;
volatile int lastShootTime = 0;
IRrecv irrecv(receiverPin);
decode_results results;
IRsend irsend(laserPin);
int pin16state = false;
void killedSomeone() {
// killedId = server.args(0);
pin16state = !pin16state;
digitalWrite(16, pin16state); //visualize it
server.send(200, "text/plain", "1"); //answer with 1
}
void handleNotFound(){
server.send(404, "text/plain", "404 error");
}
void setup() {
Serial.begin(115200);
irrecv.enableIRIn(); // Start the receiver
irsend.begin();
pinMode(triggerPin, INPUT);
pinMode(16, OUTPUT);
//connect to wifi
WiFi.begin(ssid, password);
Serial.println("");
// Wait for connection
while (WiFi.status() != WL_CONNECTED) {
delay(500);
Serial.print(".");
}
Serial.println("");
Serial.print("Connected to ");
Serial.println(ssid);
Serial.print("IP address: ");
Serial.println(WiFi.localIP());
lastNumberOfIP = getLastNumberOfIP(WiFi.localIP().toString());
//setup and start server
server.on("/", killedSomeone);
server.onNotFound(handleNotFound);
server.begin();
}
void loop() {
if (irrecv.decode(&results)) {
Serial.print("Received value: ");
Serial.println(results.value);
hit(results.value);
irrecv.resume(); // Receive the next value
}
server.handleClient();
if(digitalRead(triggerPin)) shoot();
delay(100);
}
void shoot()
{
if(lastShootTime+500 < millis()){
Serial.println("Shooting");
lastShootTime = millis();
irsend.sendNEC(lastNumberOfIP.toInt(), 36);
//irrecv.resume();
}
}
void hit(int killer)
{
// Use WiFiClient class to create TCP connections
WiFiClient client;
//const char* chKiller = "000";
//String(killer).toCharArray(chKiller,3);
//const char* host = "192.168.0." + String(killer);
String host = "192.168.0." + String(killer);
const int httpPort = 80;
if (!client.connect(host.c_str(), httpPort)) { //host: String -> const char * with c_str()
Serial.println("connection failed");
return;
}
// We now create a URI for the request
String url = "?killed=" + lastNumberOfIP;
Serial.print("Requesting URL: ");
Serial.println(url);
// This will send the request to the server
client.print(String("GET ") + url + " HTTP/1.1\r\n" +
"Host: " + host + "\r\n" +
"Connection: close\r\n\r\n");
delay(10);
/*
// Read all the lines of the reply from server and print them to Serial
while(client.available()){
String line = client.readStringUntil('\r');
Serial.print(line);
}*/
}
String getLastNumberOfIP(String ip)
{
return ip.substring(ip.lastIndexOf('.')+1);
}